YQM: Setup & Disable Queues
Software Engineer | Technical Writer
Bread and butter from React and Rails, but currently exploring Linux System Administration and Cloud Solutions/DevOps.
Learning everyday. Follow along with my series on creating Chrome Extensions, Desktop Apps (soon), and PWAs.
Here's a recap of what we want to accomplish for the first feature:
Either disable or remove all the
Add to queueUI (on hover and via the dropdown: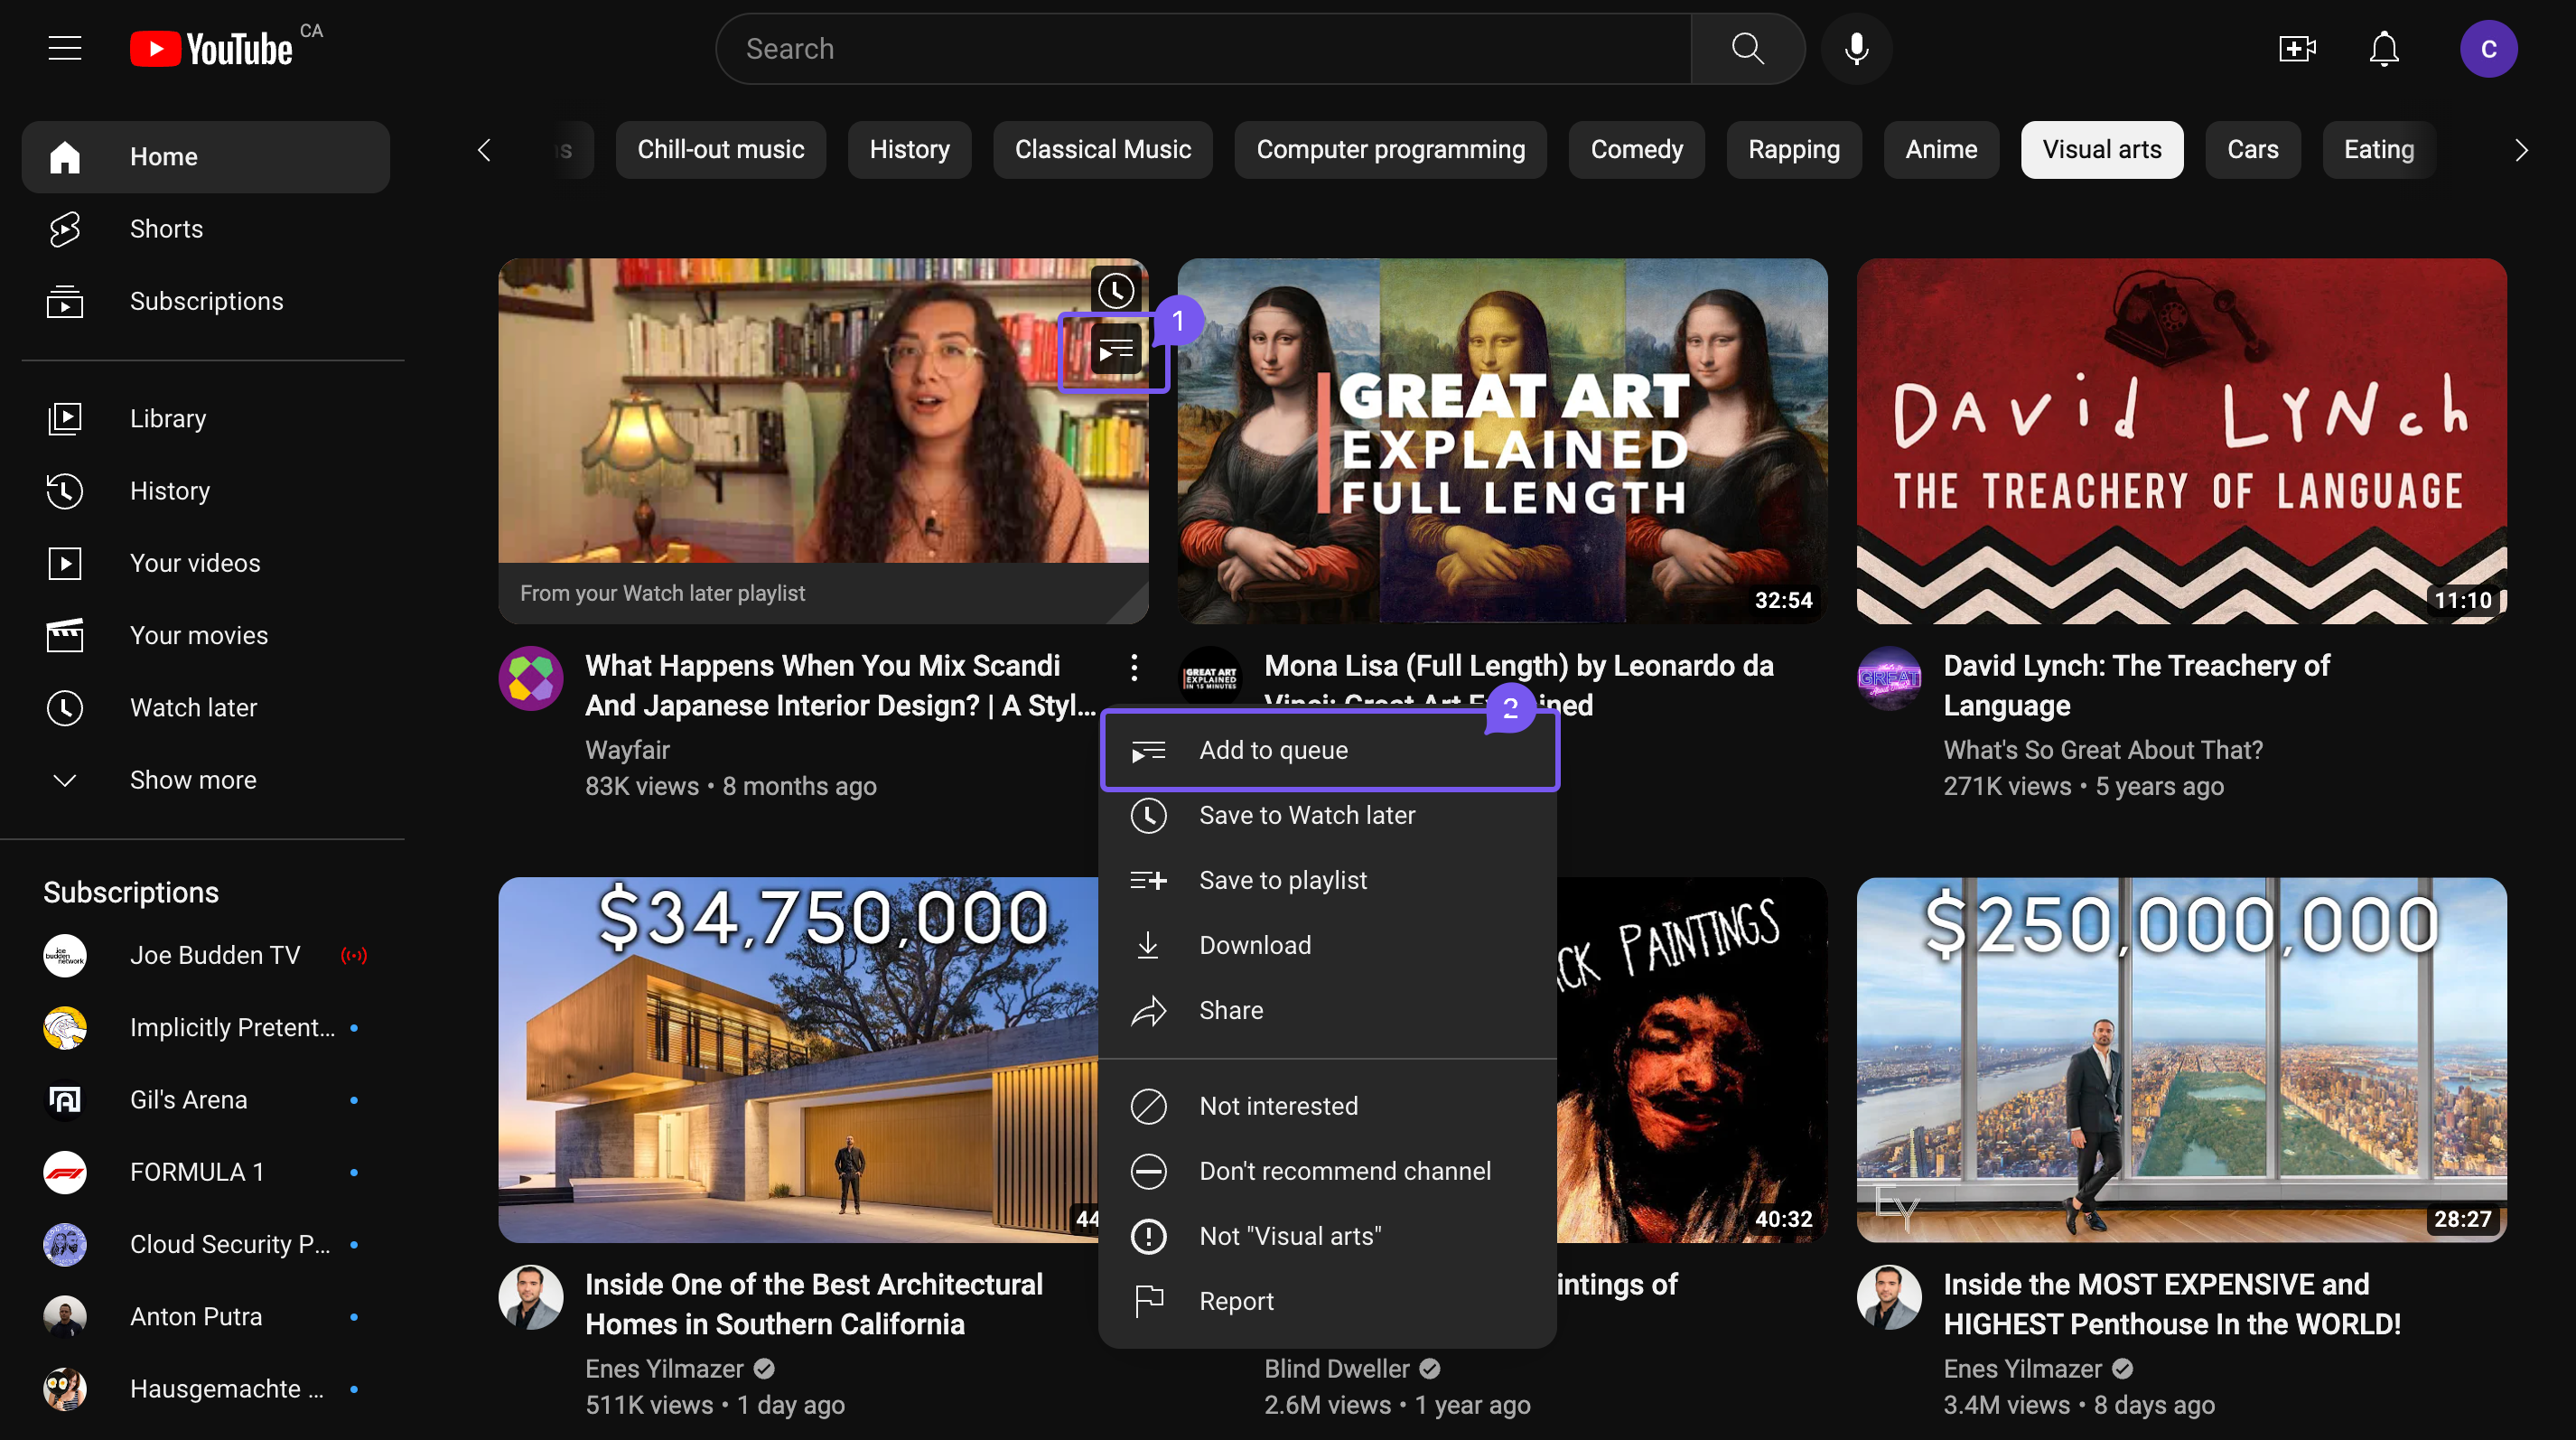
Enable or disable the first feature by clicking on the extension in the toolbar, which controls the availability of the "Add to queue" buttons.
Setup
All Chrome extensions require a manifest.json file, which is similar to a package.json file. In the manifest.json file, define the essential fields, focusing on the bare minimum needed for the setup. Fields marked with an asterisk are mandatory in every file.
The final manifest.json file at the end of the project will likely include additional fields not mentioned below, but these can be found on the MDN manifest.json documentation.
| Field | Description |
| name * | Name of the extension |
| manifest_version * | The version of the manifest to use. Strongly encouraged to use v3. |
| author | Author of the extension |
| description | Description of the extension |
| version * | The version of the extension. Update version for new releases |
| icons | Icons used for the extension in the toolbar, chrome web store, etc |
{
      "manifest_version": 3,
      "name": "YouTube Queue Manager",
      "short_name": "YQM",
      "version": "1.0",
      "author": "cdrani",
      "description": "Manage Youtube Queue Playlist",
      "icons": {
            "16": "icons/icon16.png",
            "48": "icons/icon48.png",
            "128": "icons/icon128.png"
      }
}
You should always provide a 128x128 icon; it's used during installation and by the Chrome Web Store. Extensions should also provide a 48x48 icon, which is used on the extensions management page (chrome://extensions). You can also specify a 16x16 icon to be used as the favicon for an extension's pages.
From the information provided, we have set up our manifest.json file and created an icons folder containing 16x16, 48x48, and 128x128 pixel PNG files. These images were derived from a queue-list SVG icon from Heroicons, which was subsequently resized to the necessary dimensions and converted into PNG files.
Load Extension
For testing and development purposes, we want to load the current state of our extension in our browser. To achieve this, simply enter chrome://extensions in the search bar, enable Developer mode, click on "Load unpacked," and select the extension folder. Counter 4 showcases the information from our manifest file. We will frequently use the reload button (Counter 5) to keep changes in our project synchronized with the browser.
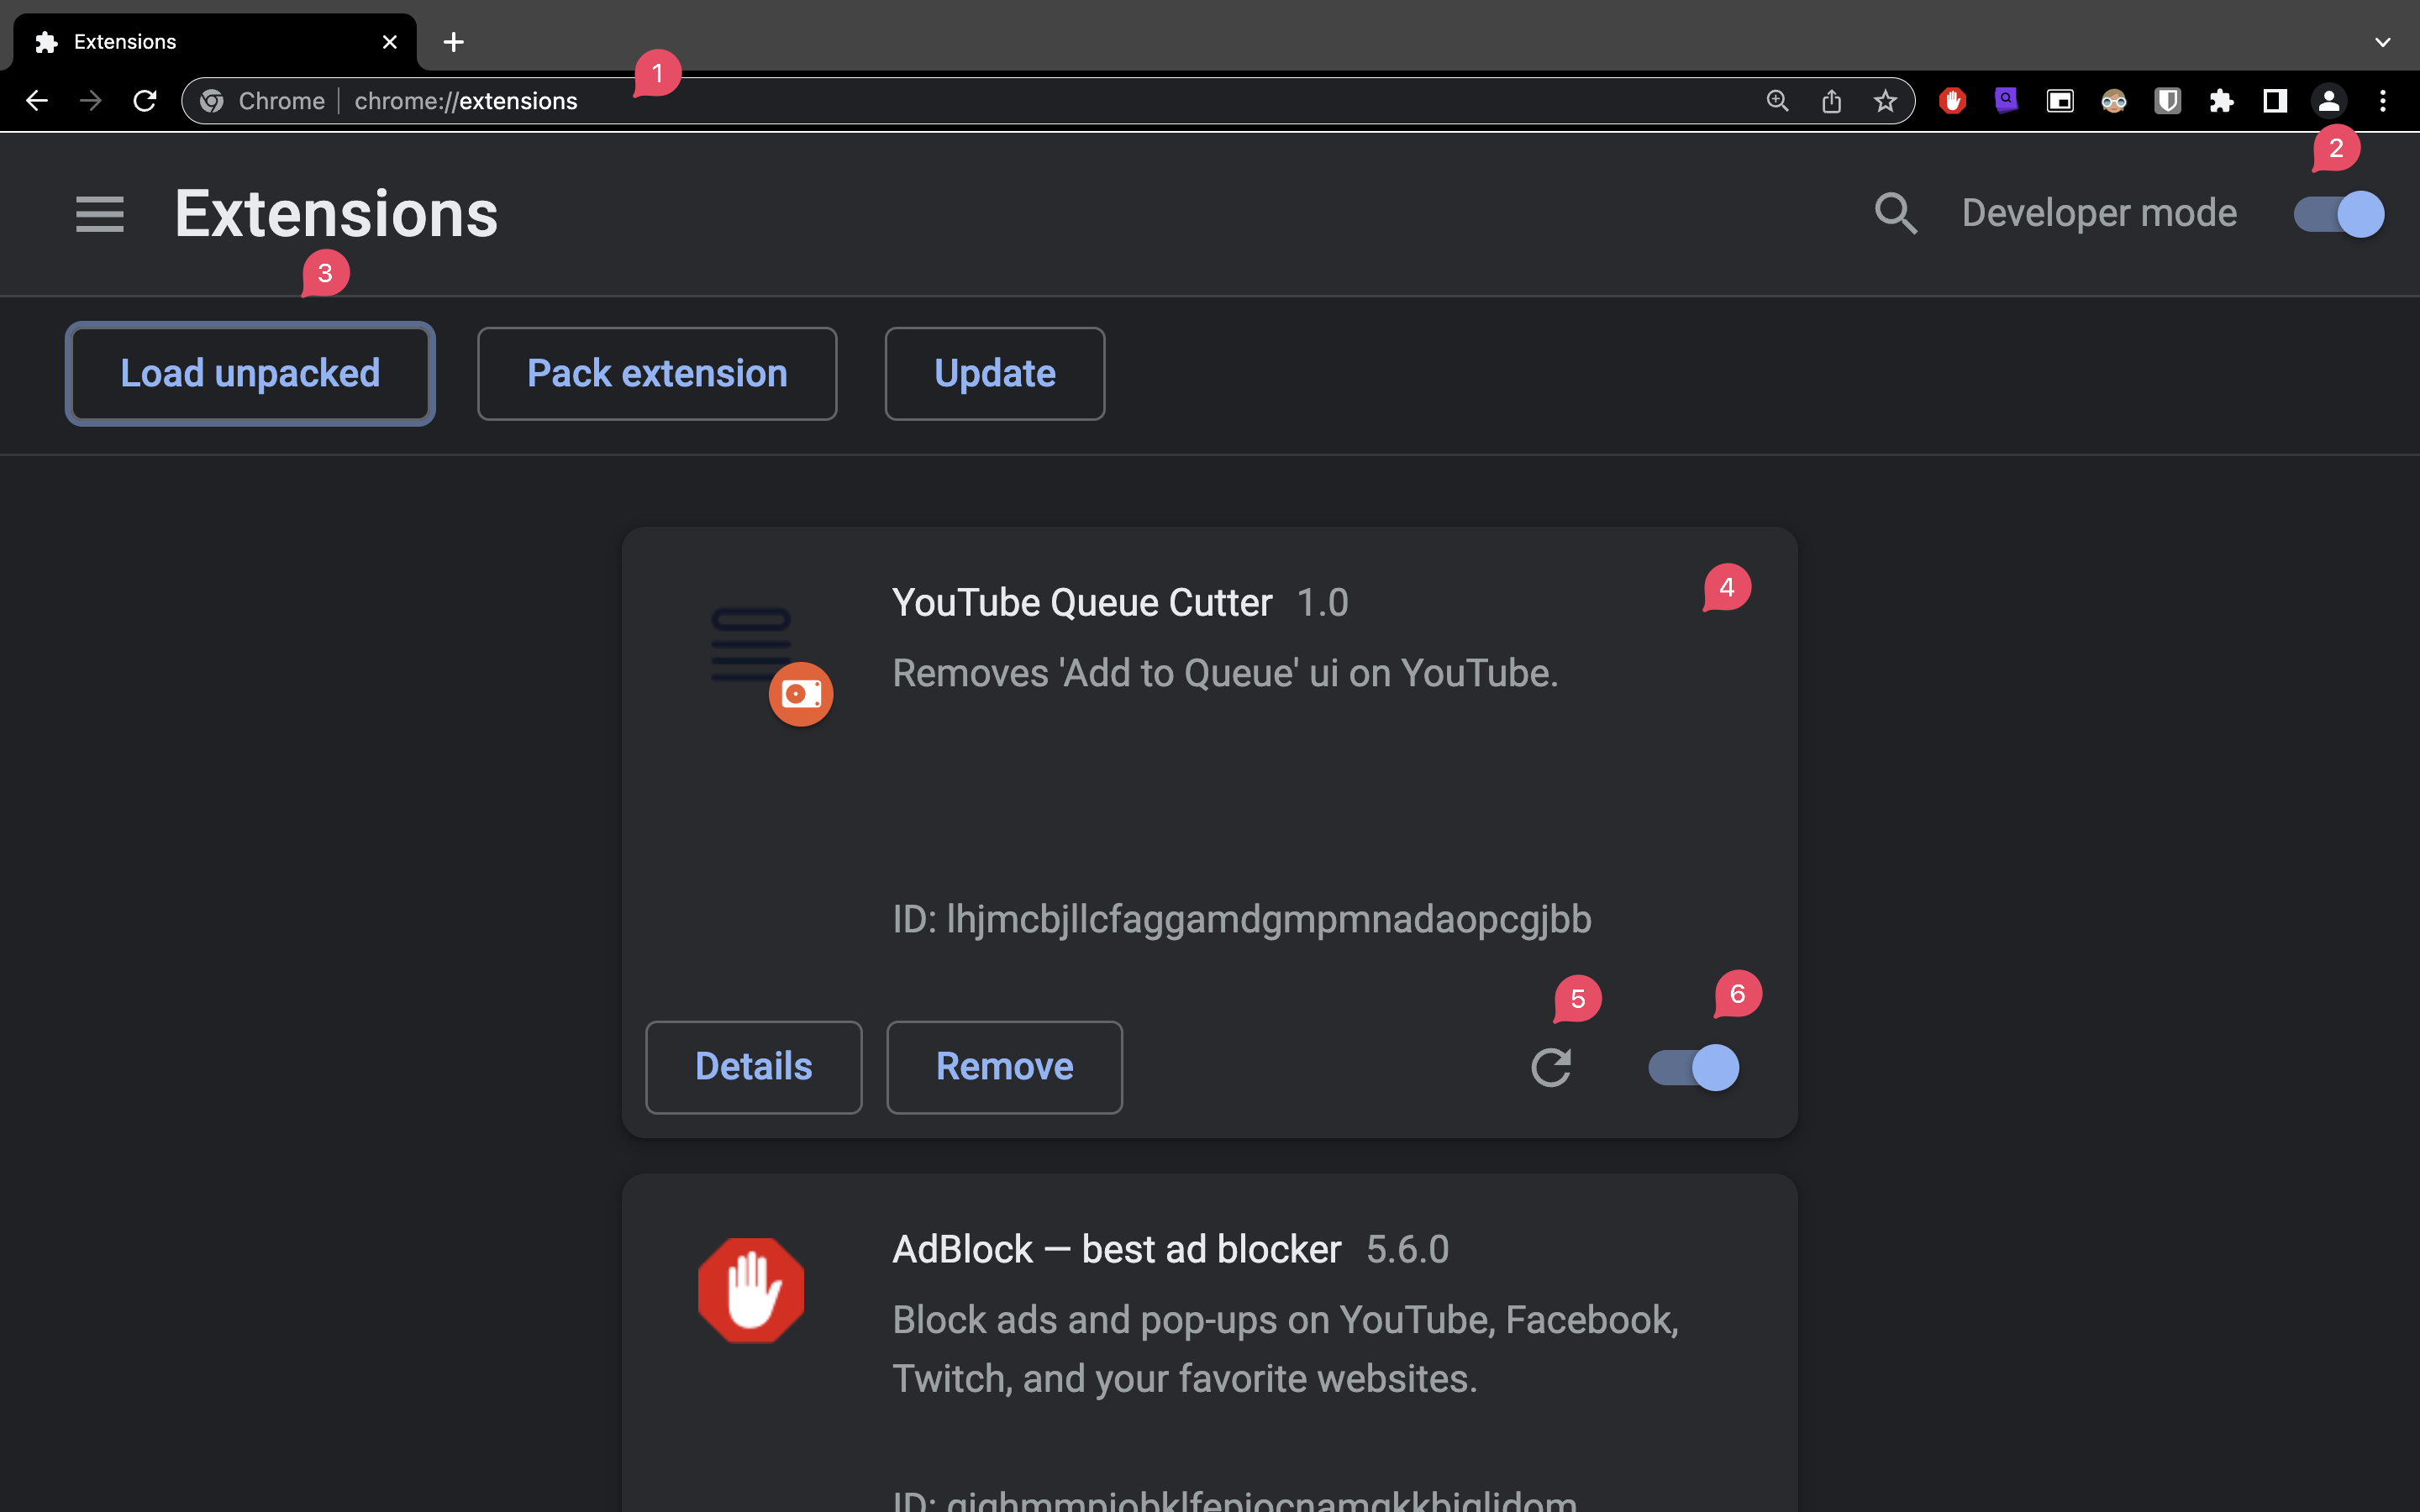
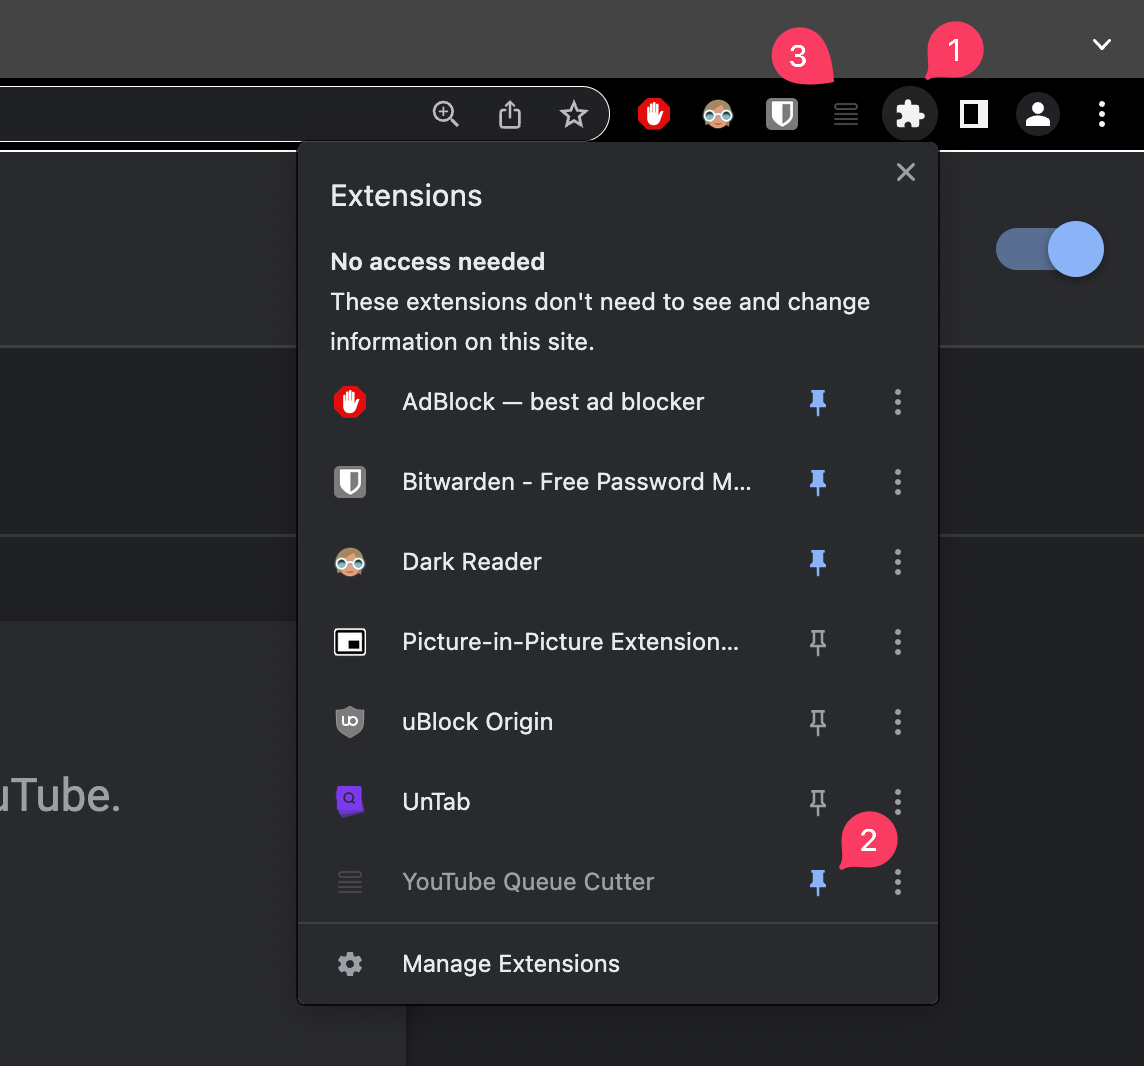
For now, we want our extension to be activated manually by clicking on it in our toolbar. Therefore, we need to pin the extension to our toolbar, ensuring it is always present for easy access.
Feature 1: Remove the 'Add to queue' UI
It took two different approaches to implement this feature. For educational purposes, both approaches will be highlighted to demonstrate the thought processes and issues which led to a pivot.
Approach 1: Utilize Event Handlers
Thought Process
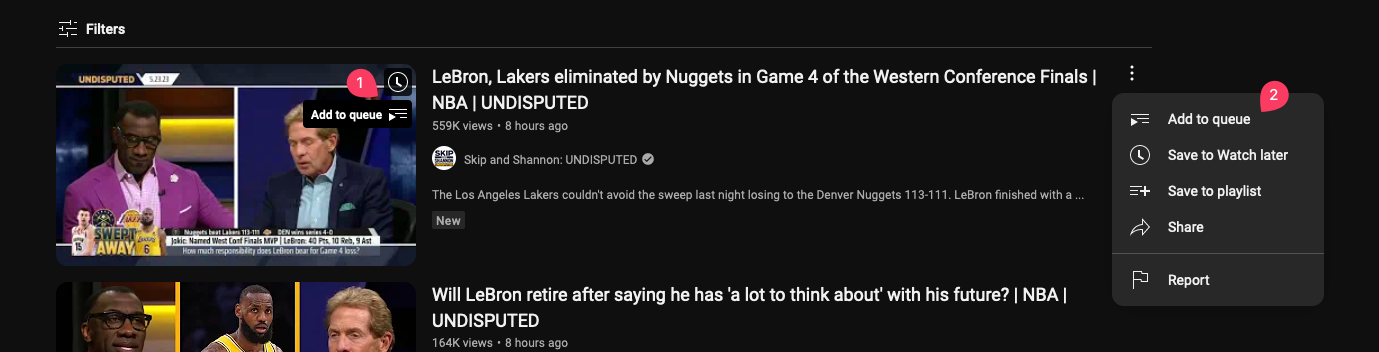
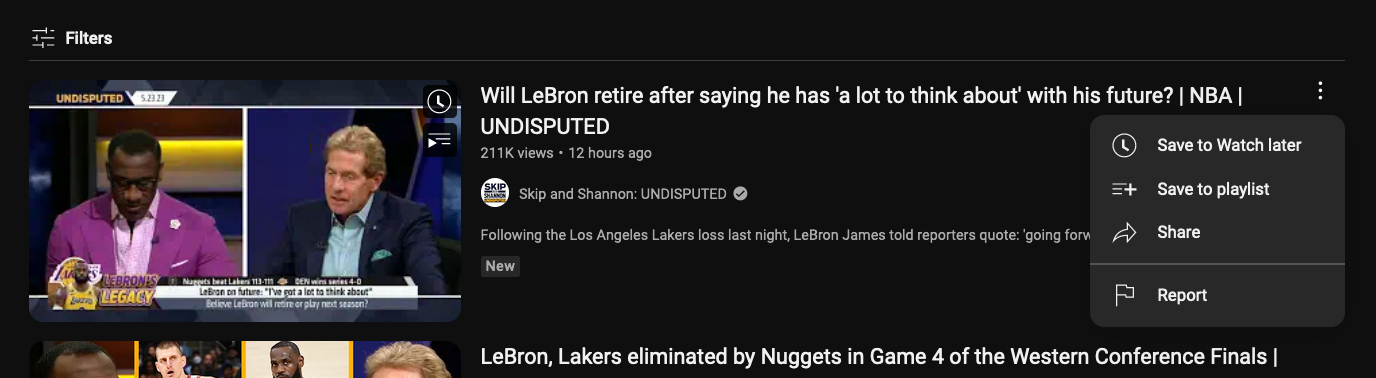
Currently, the "Add to Queue" user interface (UI) has two variations: the first features a playlist icon with a tooltip, and the second is an option within a menu item on every video. Both of them appear when hovering over a video, but the menu options are only displayed when the menu dropdown is clicked.
To remove the option from the menu, simply locate the dropdown menu component in the DOM, identify the event that triggers the display of menu options, and update the event listener to eliminate the 'Add to Queue' option.
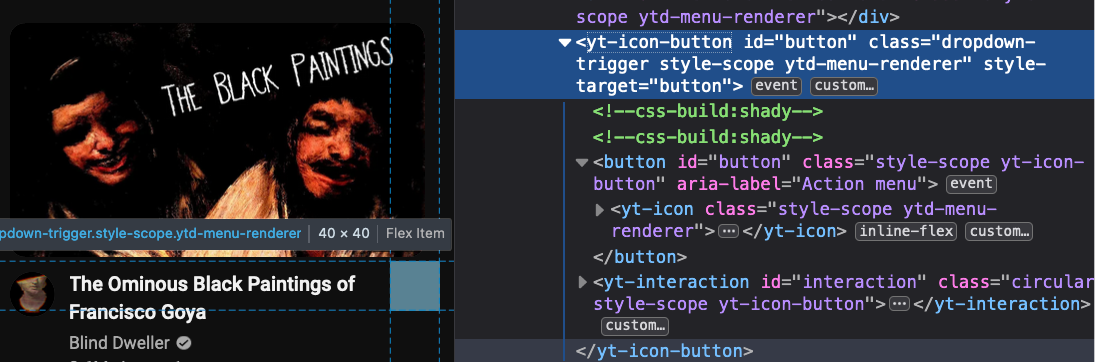
From above we see that's it the yt-icon-button element and the click event on it that reveals the menu. The menu option can be found the same way:
We have all the necessary information, so we can now create a search-and-remove script to eliminate the "Add to Queue" option based on the yt-formatted-string component. https://developer.mozilla.org/en-US/docs/Web/API/Document/evaluate
const menuButtons = document.querySelectorAll('yt-icon-button#button.dropdown-trigger')

menuButtons.forEach(mb => {
    mb.addEventListener('click', () => {
        // find the specific `yt-formatted-string` element in the menu
        const menuOptionString = document.evaluate("//yt-formatted-string[contains(., 'Add to queue')]")
        const addToQueueOption = menuOptionString.iterateNext()
        addToQueueOption?.parentElement?.parentElement?.remove()
    }
})
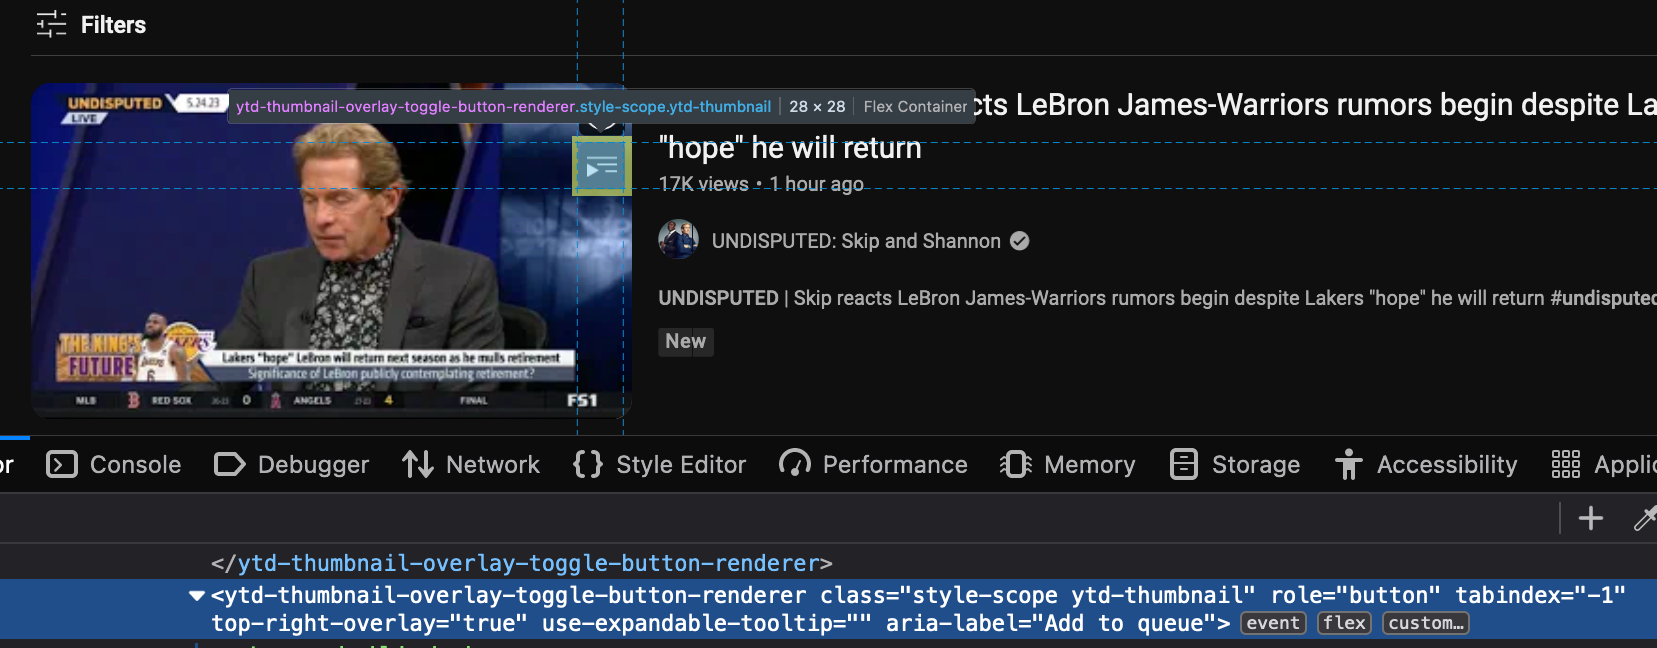
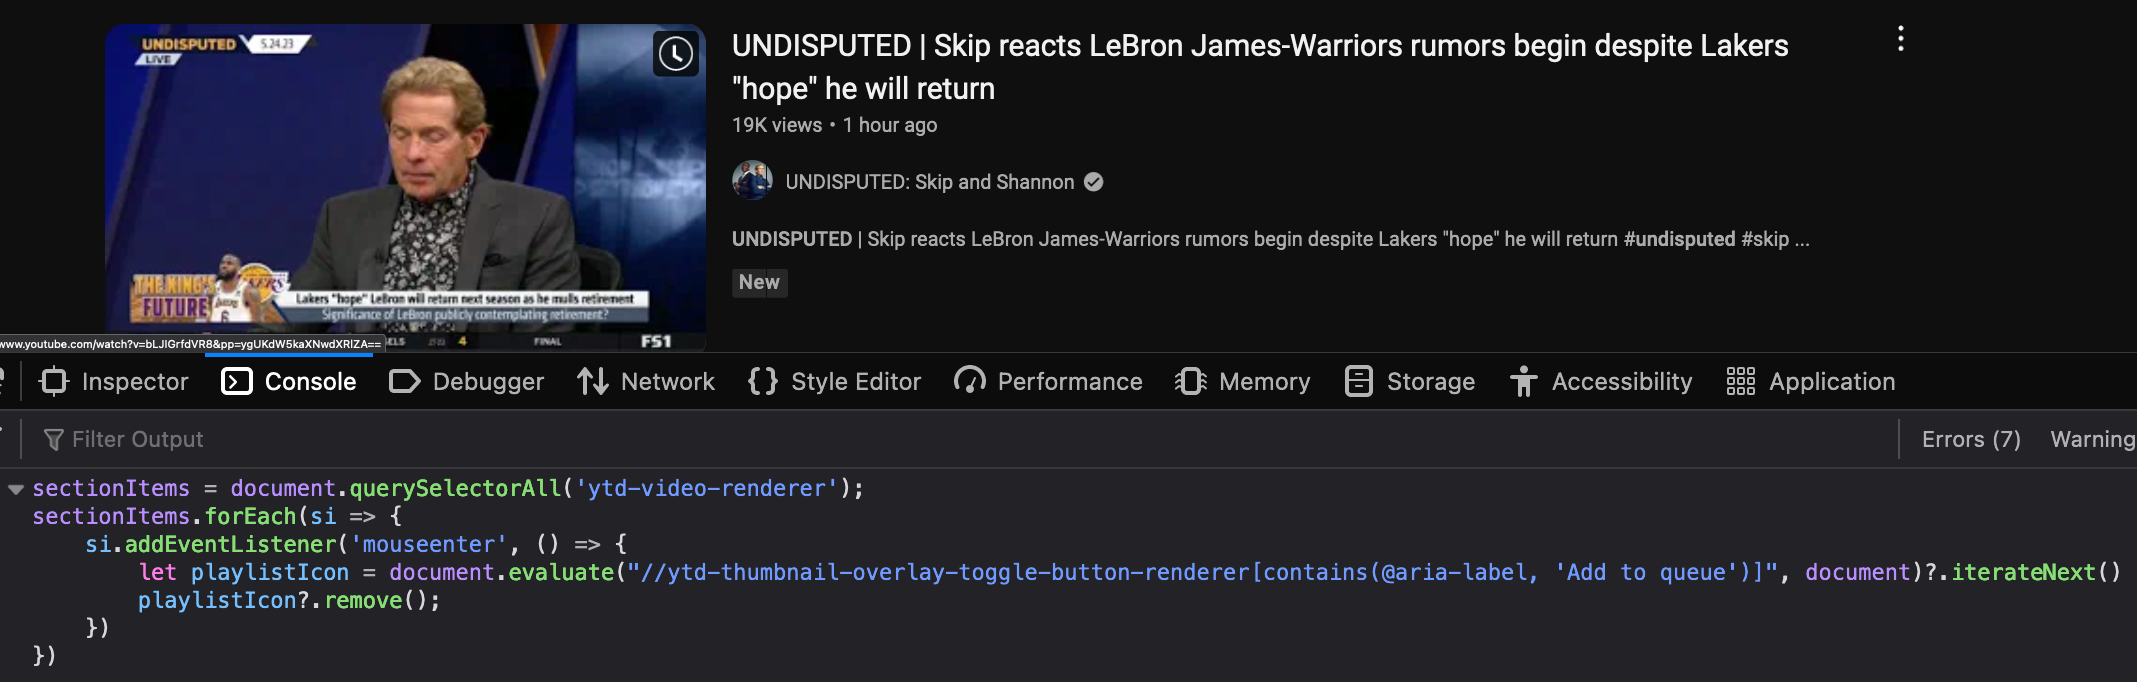
Repeat this process for the 'Add to queue' icon on the thumbnail. It's a bit harder in Chrome, but Firefox Devtools lets us see and change toggle events on elements. We want to turn off the "mouseleave" event to keep the playlist icon visible for inspection.
We now have the component for the playlist icon.
Here's the script to search and remove it.
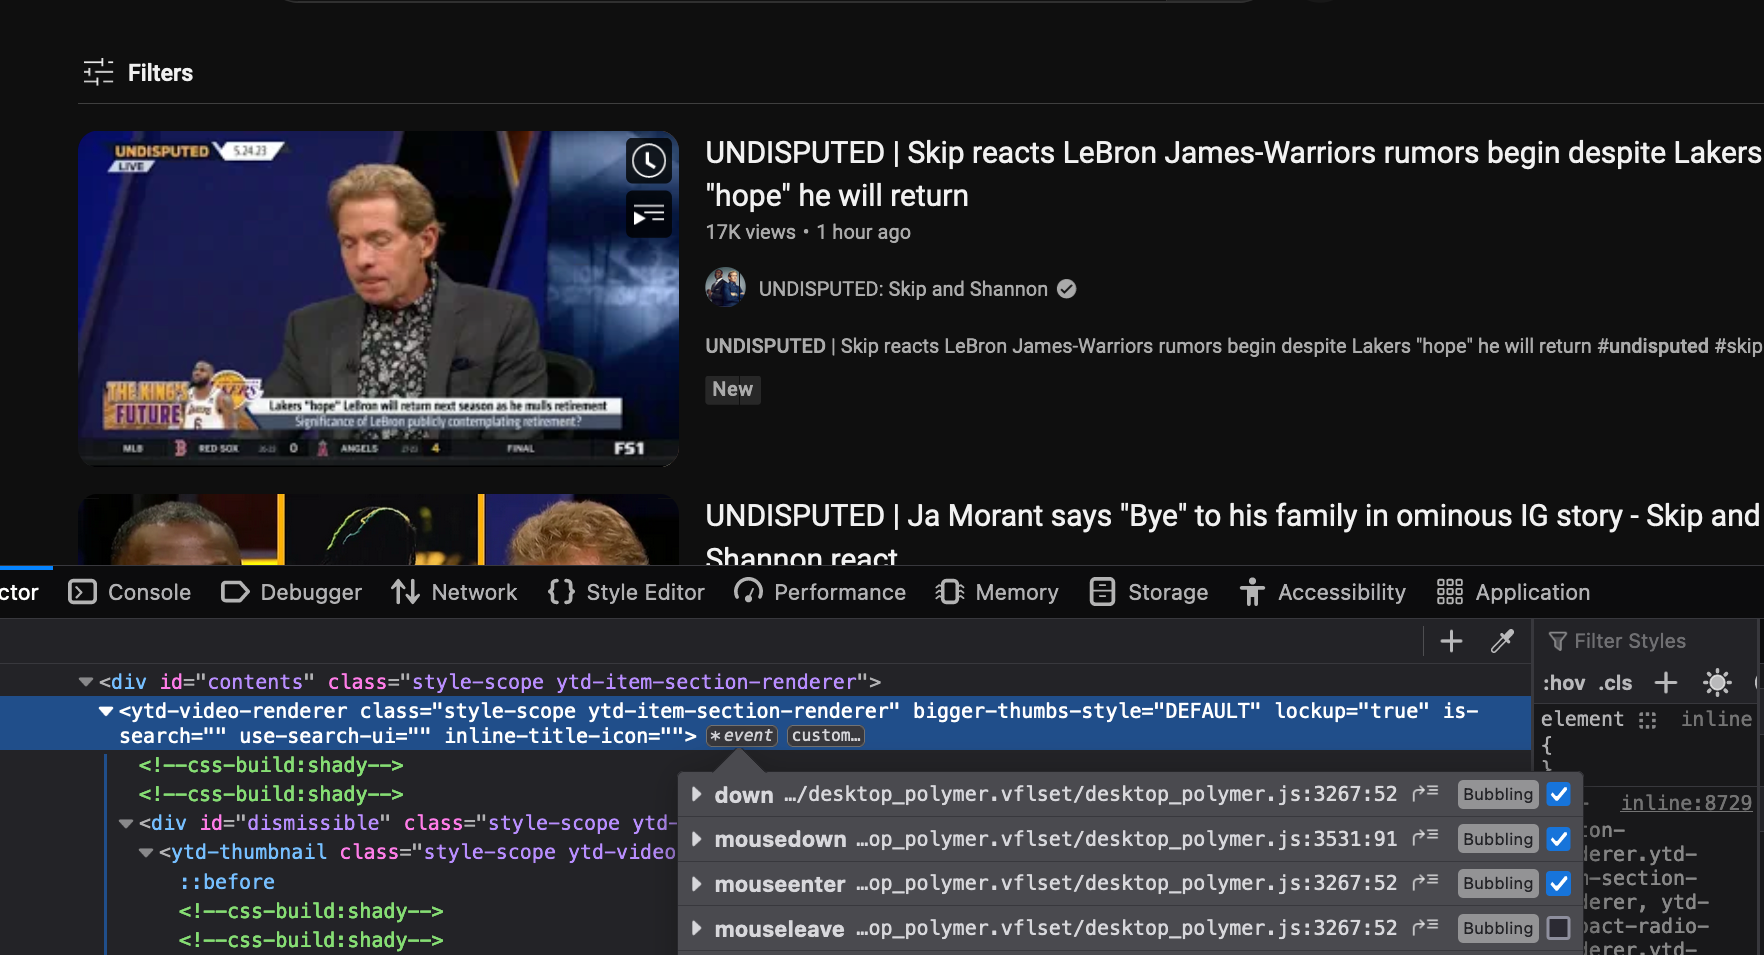
const sectionItems = document.querySelectorAll('ytd-video-renderer')
sectionItems.forEach(si => {
    si.addEventListener('mouseenter', () => {
        const playlistIcon = document.evaluate("//ytd-thumbnail-overlay-toggle-button-renderer[contains(@aria-label, 'Add to queue')]")
        const playlistIconRenderer = playlistIcon?.iterateNext()
        playlistIconRenderer?.remove()
    })
})
And it's gone.
We have a small issue in that YouTube has different components for the video section item depending on if one's on the search, home, subscription, or playlist page. The variants are ytd-grid-video-renderer, ytd-rich-grid-media ,and ytd-video-renderer . They don't all appear on the same page, so we run our script based on the youtube tab path names.
const SELECTORS = {
    '/': ['ytd-rich-grid-media'],
    '/feed/subscriptions': ['ytd-grid-video-renderer'],
    '/playlist': ['ytd-video-renderer'],
    '/@': ['ytd-grid-video-renderer', 'ytd-video-renderer']
}

function getTabPathName() {
    const selectorKeys = Object.keys(SELECTORS)
    const pathName = window.location.pathname

    const currentSelectorKey = Object.keys(SELECTORS)
        .find((key) => {
            return (key === '/' && pathName === '/') ||
                (key !== '/' && pathName.includes(key))
        });

    return currentSelectorKey
}

function getQuerySelector() {
    const tabPathName = getTabPathName()
    return SELECTORS[tabPathName]
}

function searchAndRemoveMenuOption() {
    const menuButtons = document.querySelectorAll('yt-icon-button#button.dropdown-trigger.ytd-menu-renderer');

    menuButtons.forEach(mb => {
        mb.addEventListener('click', () => {
            // find `yt-formatted-string` component in menu options
            const menuOptionString = document.evaluate(
                "//yt-formatted-string[contains(., 'Add to queue')]",         document)
            const addToQueueOption = menuOptionString?.iterateNext()
            addToQueueOption?.parentElement?.parentElement?.remove()
        }
    })
}

function searchAndRemoveQueueIcon() {
    const querySelector =  getQuerySelector()
    const sectionItems = document.querySelectorAll(querySelector)

    sectionItems.forEach(si => {
        si.addEventListener('mouseenter', () => {
            const playlistIconElement = document.evaluate("//ytd-thumbnail-overlay-toggle-button-renderer[contains(@aria-label, 'Add to queue')]", document)?.iterateNext()
            playlistIcon?.remove()
        })
    })
}
Cons
The code works, so what's wrong? Why not use it, add Chrome extension features, put everything together, and start version 1? Let's talk about the current code using a QnA format:
Q: We have added "click" and "mouseenter" events to some UI elements. This is fine initially, as there are only a few elements, but more appear as users scroll down. Should we run our script again for the entire page? How can we monitor page changes?
A: No, that would cause performance issues. We could use a MutationObserver to watch for only new changes in the DOM and re-run the script for the addedNodes.
Q: Okay, the main worry is adding new events to each item. Users might not use every updated part and can switch the extension on or off. If they turn it off, should we refresh the page to start over with the events? That could annoy users. Or, should we take away the events? It's possible, but it might cause problems since every video card item would have an event connected to it.
A: We need to consider our options. We can use the MutationObserver to check for new UI when a user hovers over a video card, locate the "Add to Queue" button, and remove it. This is faster because we only deal with one element that the user interacts with. When a user turns off the extension, we can disconnect from our MutationObserver to reset everything without harsh reloading or numerous event listeners. We can do the same for the dropdown menu options.
Q: Yes, yes, and yes! This appears to be a better approach to pursue.
Approach 2: MutationObservers
Settling on MutationObservers, we have to narrow down what DOM changes to watch for and the updated UI to take action upon.
For the dropdown menu, in the Firefox Inspector tab within the developer tools, we identify that the ytd-popup-container is the component to observe, as it renders the menu options when the dropdown is clicked.
/insert media of finding ytd-pop-container
Let's see the changes by testing our observer in the console:
const mutationObserver = new MutationObserver(mutations => {
    console.log(mutations)
})
const target = document.querySelector('ytd-popup-container')
const config = { childList: true, subtree: true }
mutationObserver.observe(target, config)
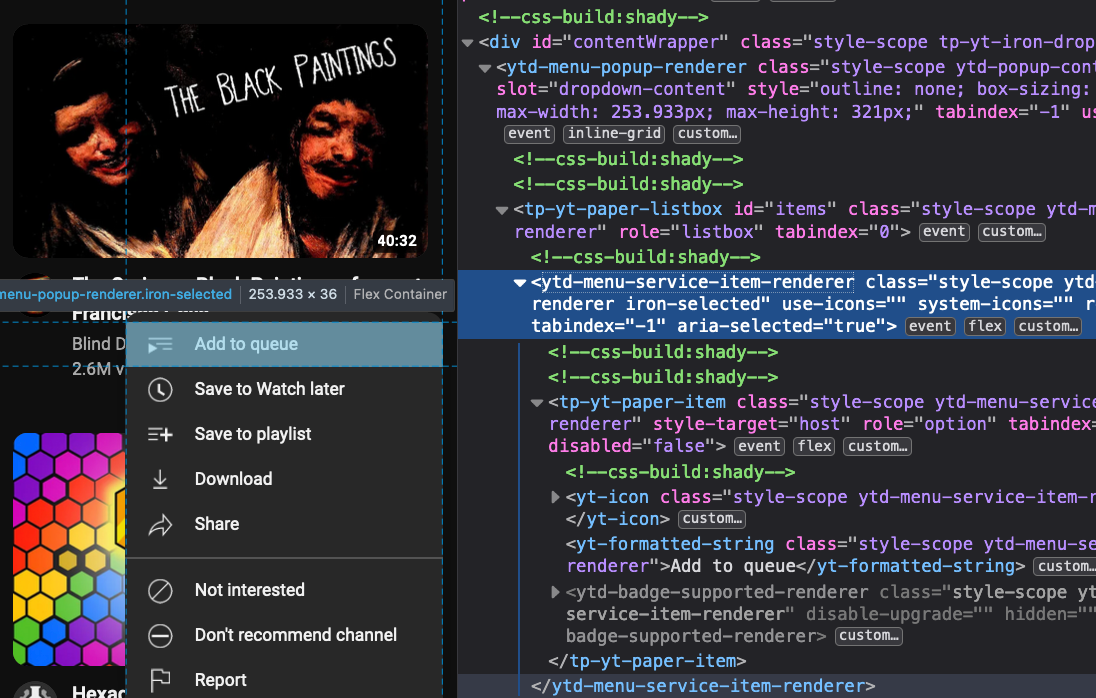
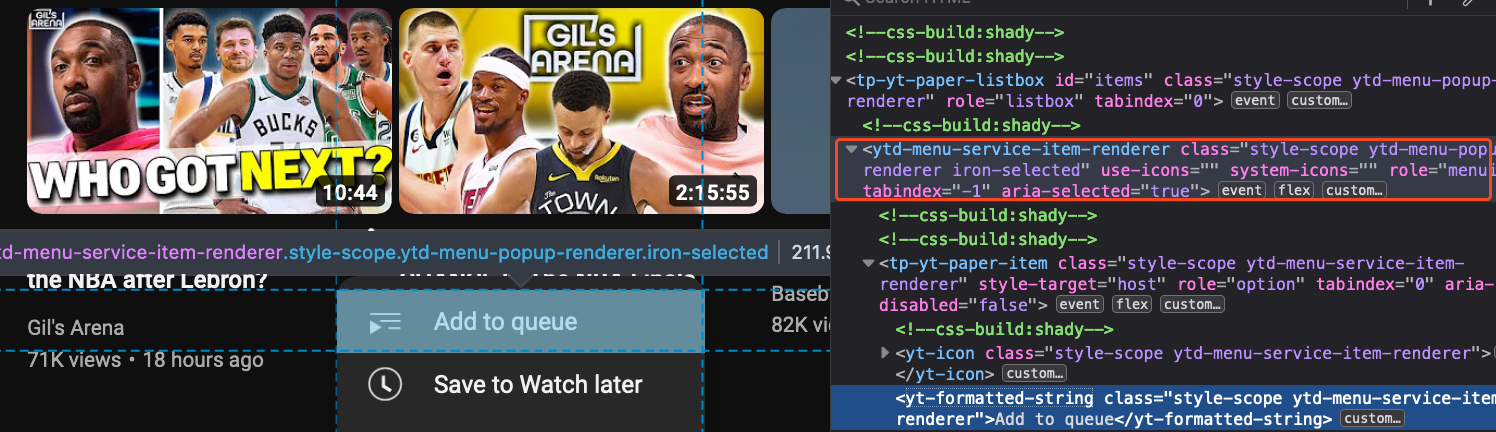
Here are the changes when you click the dropdown. The important part is when the "Add to queue" text appears in the ytd-formatted-string component.
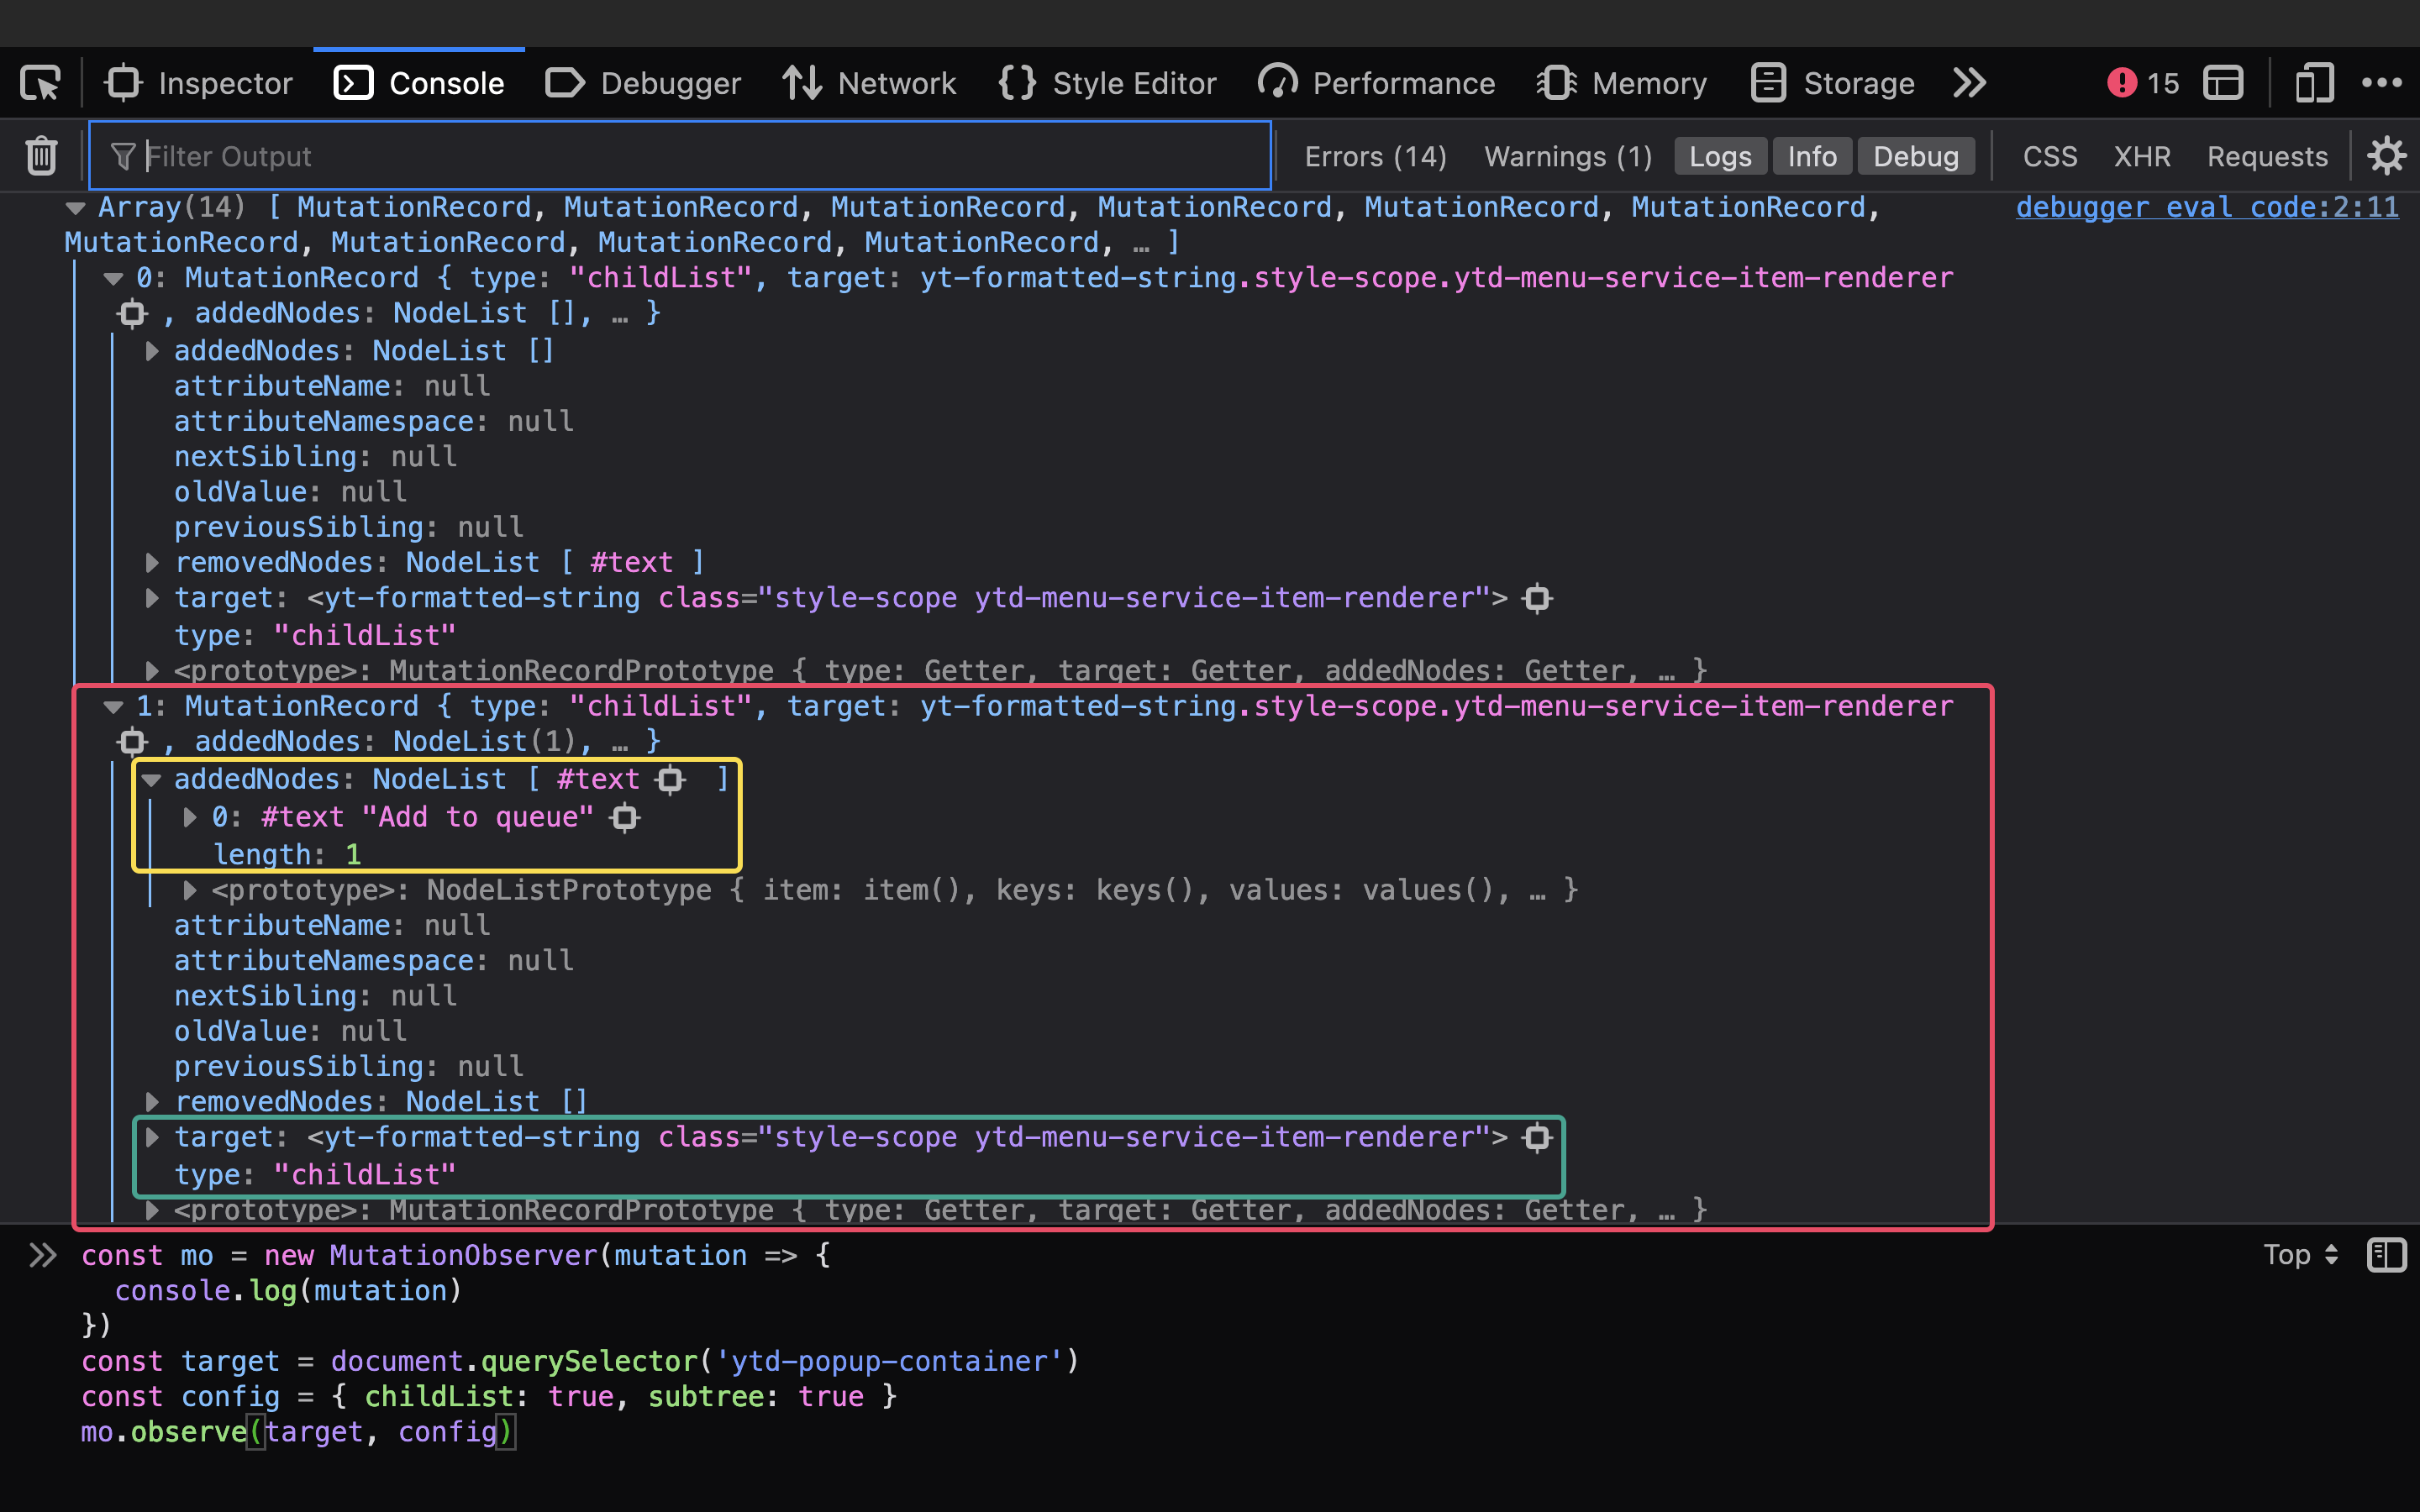
Upon identifying the precise target, we discover that the actual parent component of the yt-formatted-string is ytd-menu-service-item-renderer, which serves as the grandparent of our current element.
Removing it is quite simple.
function isMenuOption(mutation) {
    const { localName, innerText } = mutation.target
    return localName == 'yt-formatted-string'
        && innerText === 'Add to queue'
}

function clearQueueUI(mutationsList) {
    for (let mutation of mutationsList) {
        const { target, addedNodes } = mutation

        if (isMenuOption(mutation)) {
            target?.parentElement?.parentElement?.remove()
        }
    }
}

function setUpObservers() {
      const mo = new MutationObserver(clearQueueUI)
    const target = document.querySelector('ytd-popup-container')
    const config = { childList: true, subtree: true }
    mo.observe(target, config)
}

setUpObservers()

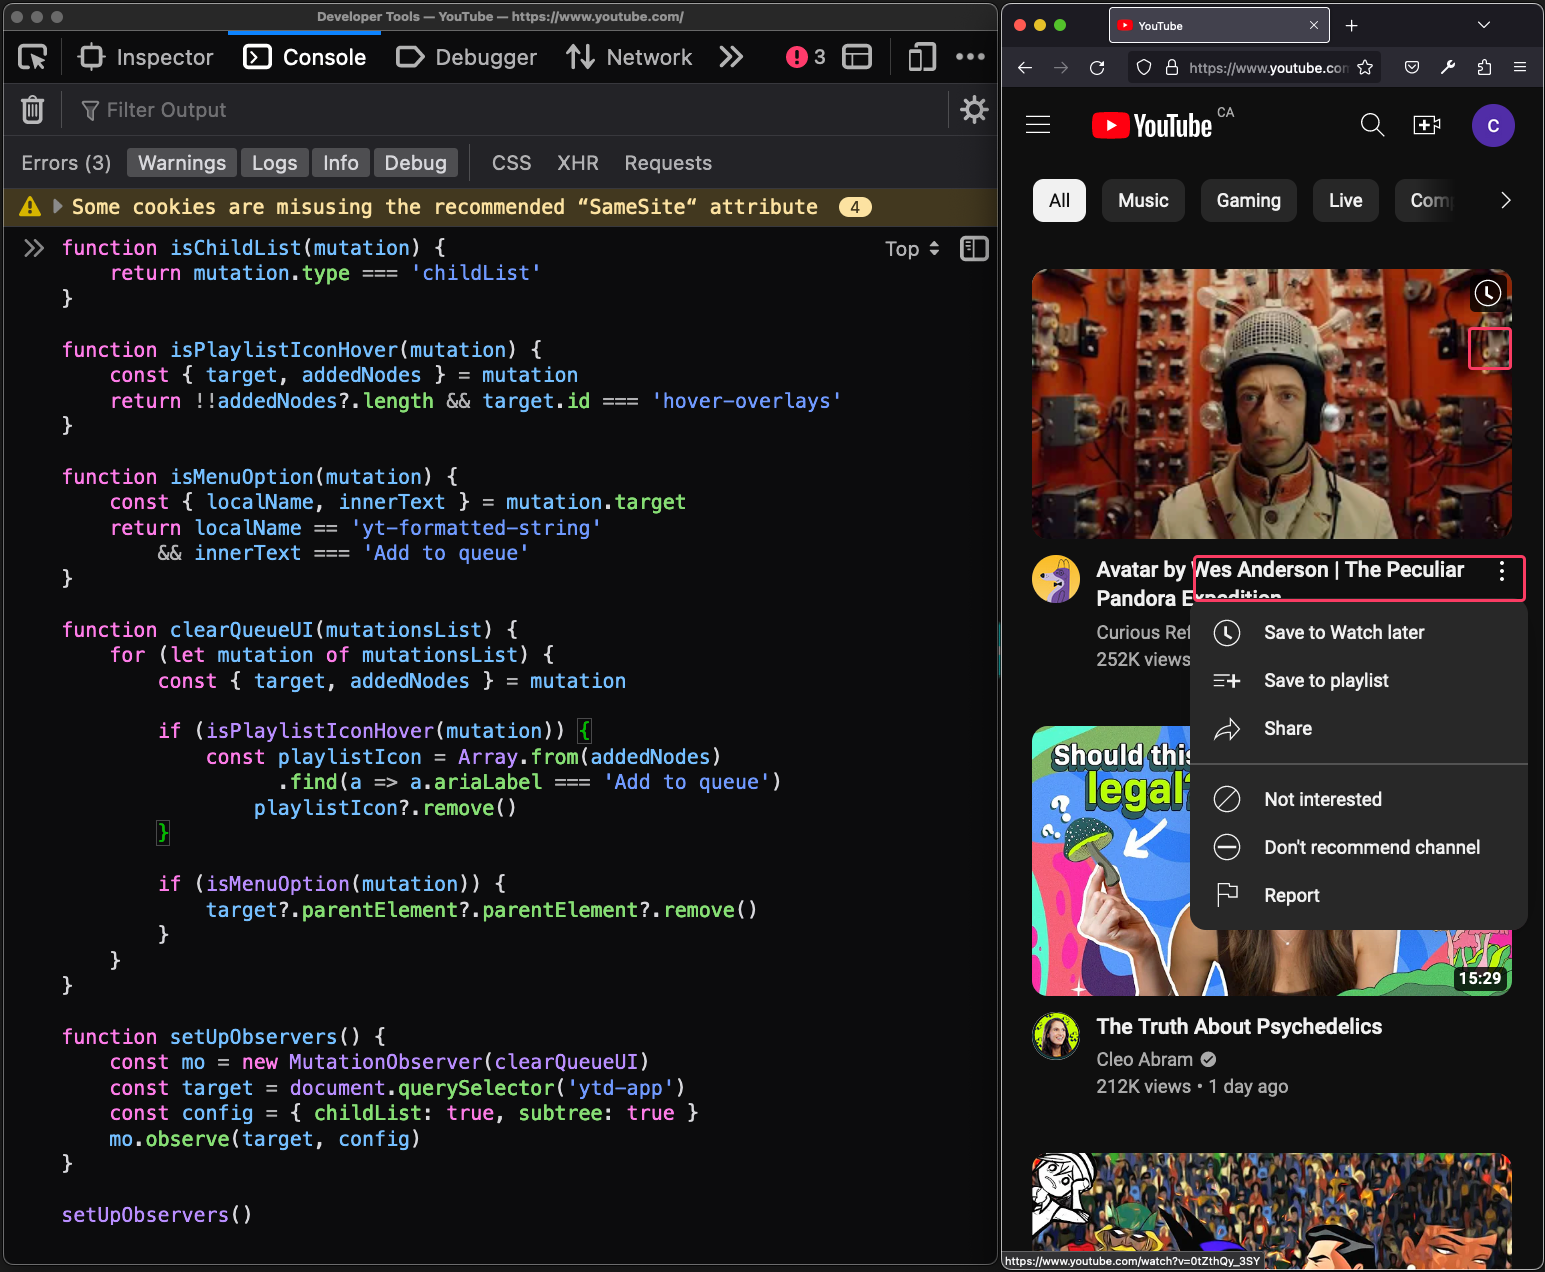
Video card components on YouTube pages have varying names, such as ytd-grid-media, ytd-rich-grid-media, and ytd-grid-video-renderer. While they appear similar, they have minor differences based on their containers. Rather than using multiple observers for each container, let's utilize the primary app container, ytd-app, which also houses the ytd-popup-container. This approach is more straightforward and doesn't cause slowdowns since we only handle a few events. Consequently, we'll modify our script to manage the menu option and playlist hover features.
function isChildList(mutation) {
    return mutation.type === 'childList'
}

function isPlaylistIconHover(mutation) {
    const { target, addedNodes } = mutation
    return !!addedNodes?.length && target.id === 'hover-overlays'
}

function isMenuOption(mutation) {
    const { localName, innerText } = mutation.target
    return localName == 'yt-formatted-string'
        && innerText === 'Add to queue'
}

function clearQueueUI(mutationsList) {
    for (let mutation of mutationsList) {
        const { target, addedNodes } = mutation

        if (isPlaylistIconHover(mutation)) {
            const playlistIcon = Array.from(addedNodes)
                  .find(a => a.ariaLabel === 'Add to queue')
                playlistIcon?.remove()
        }

        if (isMenuOption(mutation)) {
            target?.parentElement?.parentElement?.remove()
        }
    }
}

function setUpObservers() {
      const mutationObserver = new MutationObserver(clearQueueUI)
    const target = document.querySelector('ytd-app')
    const config = { childList: true, subtree: true }
    mutationObserver.observe(target, config)
}

setUpObservers()
Implementation
We have tested the above script in our console and it works across all youtube pages. Let's move it into our extension. Since the script is just a group of related functions, why not restructure it into an ObserverWrapper class? Additionally, let's add methods to disconnect our observer.
class ObserverWrapper {
    constructor() {
        this._observer = undefined
        this._selector = 'ytd-app'
        this._config = { childList: true, subtree: true }
    }

    _composeObserver() {
        const composeBox = document.querySelector(this._selector)

        const mutationObserver = new MutationObserver(this._handleMutations)
        mutationObserver.observe(composeBox, this._config)

        this._observer = mutationObserver
    }

    connectObserver() {
        this._composeObserver()
    }

    _isMenuOption(mutation) {
        const { localName, innerText } = mutation.target
        return localName === 'yt-formatted-string' && innerText === 'Add to queue'
    }

    _isPlaylistIconHover(mutation) {
        const { target, addedNodes } = mutation
        return !!addedNodes?.length && target.id === 'hover-overlays'
    }

    _isChildList(mutation) {
        return mutation.type === 'childList'
    }

    _filterMutations = (mutation) => {
        return this._isChildList(mutation) &&
                (this._isPlaylistIconHover(mutation) ||     this._isMenuOption(mutation))
    }

    _handleMutations = (mutationsList) => {
        const filteredList = mutationsList.filter(this._filterMutations)

        if (!filteredList?.length) return
        this._removeQueueUI(filteredList)
    }

    _removeQueueUI(mutationsList) {
        for (let mutation of mutationsList) {
            const { target, addedNodes } = mutation

            if (this._isPlaylistIconHover(mutation)) {
                const playlistIcon = Array.from(addedNodes)
                  .find(a => a.ariaLabel === 'Add to queue')
                playlistIcon?.remove()
            }

            if (this._isMenuOption(mutation)) {
                target?.parentElement?.parentElement?.remove()
            }
        }
    }
}
Manifest Scripts & Permissions
Chrome Extensions are by default very restrictive and we have to be explicit about our intentions. We have access to a ton of Chrome APIs, but we need to declare them in the manifest.json file. In our case, here's the list of our intents and permissions:
{
    "manifest_version": 3,
    "name": "YouTube Queue Manager",
    "version": "1.0",
    "description": "Be in control of your YouTube queues.",
    "icons": {
        "16": "icons/icon16.png",
        "48": "icons/icon48.png",
        "128": "icons/icon128.png"
    },
    "actions": {},
    "permissions": [
        "tabs",
        "activeTab",
        "scripting",
        "storage"
    ],
    "host_permissions": ["*://*.youtube.com/*"],
    "background": {
        "service_worker": "background.js"
    }
}
| Intents | Purpose |
| actions | The button that is shown on the toolbar to interact with the extension. We will utilize this to toggle on/off our extension. |
| permissions | Request users for certain privileges, such as running a script, sending a message to tabs, accessing tab(s) info, storage, etc. |
| host_permissions | Request access to youtube domain pages |
| background | background scripts will allow us to react to browser events using Chrome APIs, such as clicking on our extension, tab updates, etc (ref: Background_scripts) |
Let's start with creating a background.js file. In it, we want to register a script that contains the logic to clear the queue UI when the extension is loaded. We will make use of the registerContentScripts API.
chrome.scripting.registerContentScripts([{
    id: 'script-content',
    js: ['toggleQueue.js'],
    runAt: 'document_idle',
    matches: ['*://*.youtube.com/*']
}])
Content Scripts run in the context of a particular webpage, in our case any page that matches a youtube URL. Our toggleQueue.js file is our ObserverWrapper class with an initializer:
class ObserverWrapper {
    //
}

function init() {
    const observerWrapper = new ObserverWrapper()
    observerWrapper.connectObserver()
}

init()
Reloading the extension from the chrome://extensions page and a youtube tab will now show an updated UI with any form of queue UI removed.
Feature 2: Toggle Extension On/Off
We need to be able to toggle our extension on/off when a user clicks on the extension icon in the toolbar. Therefore, we will need to take the following steps:
Upon installing the extension, we must create a state object that stores the extension's current status (active/inactive). The initial state will be set to active.
Display a badge on the extension to consistently indicate its current state. For readability, it will simply show "on" or "off" with a green or red background, respectively.
Establish a messaging system between our service worker (background.js) and content script (toggleQueue.js). The service worker will transmit the current state of the extension, while the content script will listen for these messages. If the state is active, we will connect our observers to monitor changes in the DOM and update our UI accordingly (as currently implemented); otherwise, we will disconnect our observers.
Add an onClicked event listener in our service worker that listens for clicks on the extension icon. These clicks will toggle the active state and send a message containing the updated state. The incoming message will initiate the same actions described in the second part of point 3.
Additional event listeners for active tab updates such as reload, path changes such as from "/" to "/feed/subscriptions".
Defining State Object
Our state object will be simple, with just an active key storing a boolean value, and an event key (optional for debugging) with a string value of the event listener in which the state is sent to the content script. There are multiple storage options provided by the API, but we will utilize the local option. Additionally, with the active state set, we can display a badge based on the state.
function setBadge(active) {
    chrome.action.setBadgeText({ text: active ? 'on' : 'off' });
    chrome.action.setBadgeBackgroundColor({ color: active ? 'green': 'gray' });
}

// Currently no event will be used to set this state
chrome.storage.sync.set({ state: { active: true, event: '' } }, () => {
    if (chrome.runtime.lastError) {
        console.error('Error while saving the updated value:', chrome.runtime.lastError)
        return;
    }
    setBadge(true);
})
Our state object will only be initialized or updated through an event listener. The first event listener will be triggered by the onInstalled event when a user installs the extension. This would be an ideal location to register content scripts, initialize our state, and send the first message.
function setBadgeInfo(active) {
    chrome.action.setBadgeText({ text: active ? 'on' : 'off' });
    chrome.action.setBadgeBackgroundColor({ color: active ? 'green': 'gray' });
}

function stateResolver({ resolve, reject, result, key }) {
    if (chrome.runtime.lastError) {
        return reject({ error: chrome.runtime.lastError })
    }
    return key ? resolve(result[key]) : resolve()
}

function getState({ key = 'state' }) {
    return new Promise((resolve, reject) => {
        chrome.storage.local.get(key, (result) => {
            return stateResolver({ key, resolve, reject, result })
        })
    })
}

function setState({ key = 'state', value = {} }) {
    return new Promise((resolve, reject) => {
        chrome.storage.local.set({ [key]: value }, (result) => {
            return stateResolver({ resolve, reject, result })
        })
    })
}

async function registerScripts() {
    return await chrome.scripting.registerContentScripts([{
        id: 'script-content',
        js: ['toggleQueue.js'],
        runAt: 'document_idle',
        matches: ['*://*.youtube.com/*']
    }])
}

chrome.runtime.onInstalled.addListener(async () => {
    await registerScripts()
    const result = await setState({
        key: 'state',
        value : { active: true,  event: 'onInstalled' }
    })

    if (!result?.error) setBadgeInfo(true)
}
We set the badge info on the onInstalled event listener, but on subsequent state changes, we have access to an onChanged event listener for storage. In this listener, is where it would be ideal to update our badge info and send messages to our content script about these changes.
async function getActiveTab() {
    const result = await chrome.tabs.query({
        active: true,
        currentWindow: true,
        url: ['*://*.youtube.com/*'],
    })

    return result?.at(0)
}

function messenger({ tabId, message }) {
    return new Promise((reject, resolve) => {
        chrome.tabs.sendMessage(tabId, message, (response) => {
            if (chrome.runtime.lastError) {
                return reject({ error: chrome.runtime.lastError })
            }
            return resolve(response)
        })
    })
}

async function sendMessage({ message }) {
    const activeTab = await getActiveTab()
    if (!activeTab) return

    return await messenger({ tabId: activeTab.id, message })
}

chrome.storage.onChanged.addListener(async changes => {
    const { newValue } = changes.state
    setBadgeInfo(newValue.active)
    await sendMessage({ message: newValue })
})
The second to last step is accounting for toggling the extension on/off on an onClicked event upon clicking the extension, an onActivated event for when a tab is switched to, i.e clicked on and made active, and an onUpdated if the tab has some updates, such as a path change from "/" to "/feed/subscriptions" or page reload.
chrome.tabs.onActivated.addListener(async () => {
    const state = await getState({ key: 'state' })
    await sendMessage({ message: { active: state.active, event: 'onActivated' } })
})

chrome.action.onClicked.addListener(async () => {
    const state = await getState('state')
    await setState({
        key: 'state',
        value: { active: !state.active, event: 'onClicked' }
    })
})

chrome.tabs.onUpdated.addListener(async (_, changeInfo, tab) => {
    if (tab.active && changeInfo?.status === 'complete' && tab.url.includes('youtube.com')) {
        const state = await getState({ key: 'state' })
        sendMessage({ message: { active: state.active, event: 'onUpdated' } })
    }
})
The final step involves listening for any messages sent from our background script and taking appropriate action. If the message object's 'active' value is true, connect the observer; otherwise, disconnect the observer. Let's implement the message listener and disconnection functionality.
Class ObserverWrapper {
    // ...

    // disconnect observer logic
    _reset() {
        this._observer?.disconnect()
        this._observer = undefined
    }

    disconnectObserver() {
        this._reset()
    }
}

function listenForMessage(callback) {
    chrome.runtime.onMessage.addListener(message => {
        callback(message)
    })
}

function init() {
    const observerWrapper = new ObserverWrapper()

    function messageCallback(message) {
        message.active
          ? observerWrapper.connectObserver()
          : observerWrapper.disconnectObserver()
    }

    listenForMessage(messageCallback)
}

init()
Wrap Up
In conclusion, this article demonstrates how to create a YouTube Chrome Extension that effectively disables the "Add to Queue" UI on YouTube pages. By utilizing Chrome APIs and JavaScript, we implemented a functional extension that can be toggled on and off by the user. This tutorial showcases the thought process, challenges, and solutions involved in developing a Chrome Extension, ultimately providing a solid foundation for further exploration and development in this area. The next post in this series will detail how to package this extension for release on the Chrome Web Store.